
Ghana Cornrow Braids | How To Do Ghana Braids Tutorial
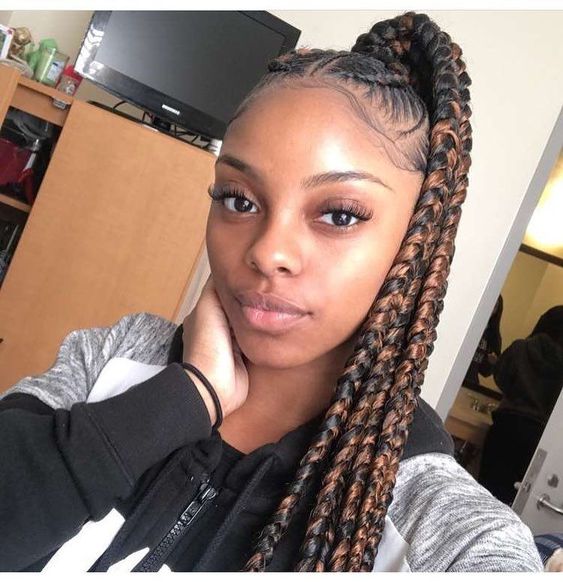
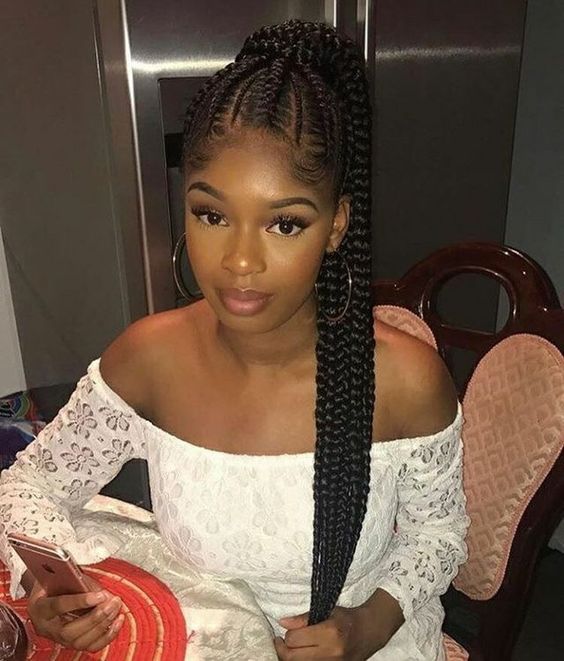
Ghana braids, also known as Banana Braids, Feed-in Braids or straight backs, have become increasingly popular over the years, they are basically thick braids that run down your head. The braids can take time and result in the use of a lot of braiding hair, but these dramatic braids yield results that are very much worth it. Depending on if you would like a dramatic look or a more natural look, these braids can be a great protective style and are perfect for any season. Kanekalon braiding hair is more commonly used to achieve this style.
1How to Achieve the Ghana Cornrows Look?

No matter if you are a natural or someone who has relaxed hair, it is always best and even recommended to start with freshly cleansed hair. This doesn’t just apply to braided hair styles but any protective style where your hair may be completely tucked away. Doing so, will help maintain a cleansed scalp so that you will not get product build up too fast, therefore resulting in a longer lasting hairstyle. No matter if you are a natural or have relaxed hair, it would be best to perform a deep conditioning treatment and a protein treatment prior to starting this style. The point being is your hair is in a state where you can’t manipulate it, properly clean it or give it the proper nutrients it will need. Doing these treatments will provide a protective barrier that will hold some needed nutrients for your hair. At the end of the day we all desire for healthy hair and taking the proper precautions before, during and after styling will help with that.
2Hair Prepping for Ghana Braids
After your hair is freshly washed and moisturized, you will want to blow dry it and stretch it out. You can apply braids to wet hair, but it is not recommended, and you will get better results if your hair is dry and blown out, this will prevent any knotting or tangling during the braiding process and your overall results will look much neater. After you hair is dry you will apply a hair conditioning grease to your scalp, and a hydrating cream to your hair. Try opting for a cream designed especially for braids.
3Parting and Setting Up
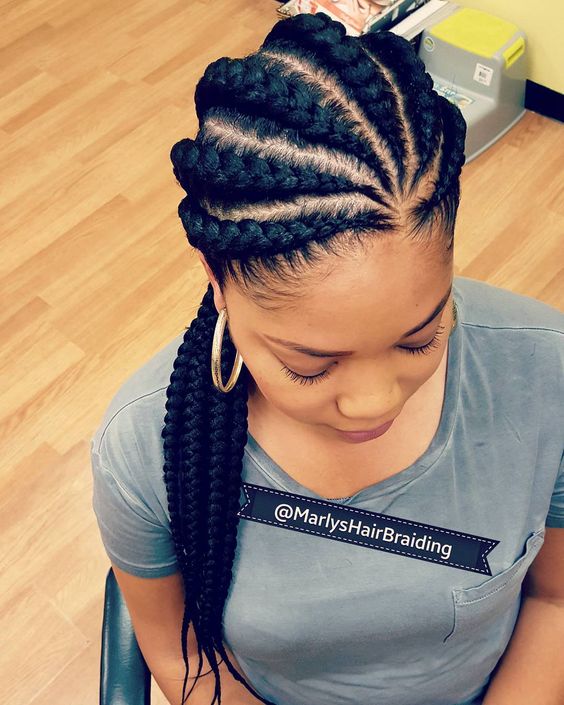
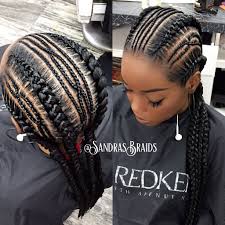
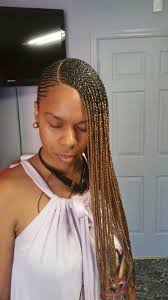
Once your hair is properly moisturized and prepped, you can decide on how many braids you want and how big you want them as well. Just keep in mind the more braids you want and the bigger they are will result in the use of more braiding hair. After your decision is made you can start parting your hair with a rat tail comb, based on the number of braids you want and the specific style you are trying to achieve. Being sure your parts are neat, clean and straight. No matter if you just want some basic braids you can always get creative with the parting, many people start their parting at the center of their hairline. As you are parting and are satisfied with it, pin-it up so that it is separate from the rest of your hair. Once your hair is parted and separated it is time to prep your kanekalon braiding hair based on your braid size and the number of braids you want, commonly about 12 strands of braiding hair will be used for each braid. For more dramatic braids or thicker ones, you will use 24 strands of braiding hair. Each strand of braiding hair will be bigger in size then the previous. You can not only make your braids thicker, but you can add color as well. As you are setting your braiding hair out be sure to feather each end, so as you are braiding, your ends will gradually get smaller in size as you reach down to the end of the braid.
Please note that doing this style on your own, you will need to know how to do a basic cornrow and how to apply braiding hair to your head as well. If you are unsure, please seek advice or help from a professional braiding hair stylist.
4Braiding Ghana Braids Cornrows Style

- To begin styling your hair, take one of your parted sections of your natural hair, you will start at the top of your hair line and separate a small patch into three strands, start doing a basic cornrow, braiding about 2 or three times.
- Now you will take the smallest portion of your braiding hair, fold it in half and bring it up to meet your natural hair, being sure the folded part is toward you hairline and the rest of the hair is falling down the back of your head along with your natural hair.
- Fed the middle strand of natural hair threw the loop of the kanekalon braiding hair. Being sure the hair is in the center of your natural hair and scalp, once it’s in place you can start adding the rest of the braiding hair along with your natural hair. Left strand of hair with the left side of your natural hair and following the same process for the right side.
- Continue braiding once you feel the braiding hair is in the right place and secure, again braiding two or three times being sure to add your natural hair in along the way. If you’re going for more natural looking hairstyle, you will then add another strand of kanekalon braiding hair, but if you are going for something thicker or dramatic you will be adding braiding hair on each strand of natural hair.
- Be sure to make everything neat and tight as you work your way down, you can add more gel or hair cream to your hair to keep any stray hairs in place.
- Once you get down to the nape of your neck you should be adding your final piece of braiding hair to your head, if your are looking for something more natural. If not, you can braid down a little further adding three more strands.
- Once all of your braiding hair is in, you will add more gel or cream to keep any fly always tucked away. Now start performing a basic plait, braiding straight down until you reached the end of your desired length.
- Repeat this entire process for the rest of your head. Be sure to take a break in between each braid if your doing it yourself, your arms will get tired and become very sore. Try to reframe from taking a break in the middle of the cornrow, as this may cause you to mess up or for your hair to become slightly loose.
5Ending the Braids

If you stretched the braiding hair at the beginning, you can skip this step. If not, you can take a pair of scissors and softly cut upward thinning out the ends of the hair.
There are different methods to ending the braids to prevent unraveling, the most popular and easiest method is to dip the ends of the braids in boiling water for 10 – 15 seconds. Being sure as you pull the hair out the water you don’t burn yourself. You may also slightly burn the ends to join them together, or you may place a clear rubber band on the ends.
Once you are done braiding your entire head and sealed your ends to your liking, being sure they are secured and will not unravel. You will want to lay any flyaways down, this is done by adding mousse to your entire head and letting it sit until its dry or sitting under the dryer, follow this step with laying your baby hairs down with some edge control or gel. Depending on how stubborn your hair is you may need to place a scarf around your edges for a few minutes to prevent your edges from lifting up.
6Ghana Cornrows Maintenance
To maintain your hairstyle, you may reach for satin bonnet at night. But before you put it on rub your scalp and braids down with a carrier oil to keep your hair underneath moisturized. Be sure to place the oil on your edges to. You will want to co-wash your hair every week, to move any build-up and dirt.
7Ghana Braids Styling Tips
If you are unsure how you want to style your Ghana braids, here a few tips that may help better flatter your face.
8Straight Ghana Braids
For people with round & oblong faces, can opt for simple straight back braids or a low bun braid that will add length and accentuate their facial structure.
9Ghana Braids Updo
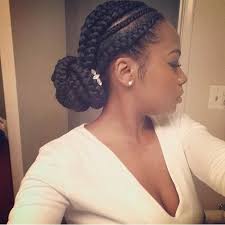
Pull your ghana conrows into a mega low bun, to achive a beautiful protective style for a wedding or night out.
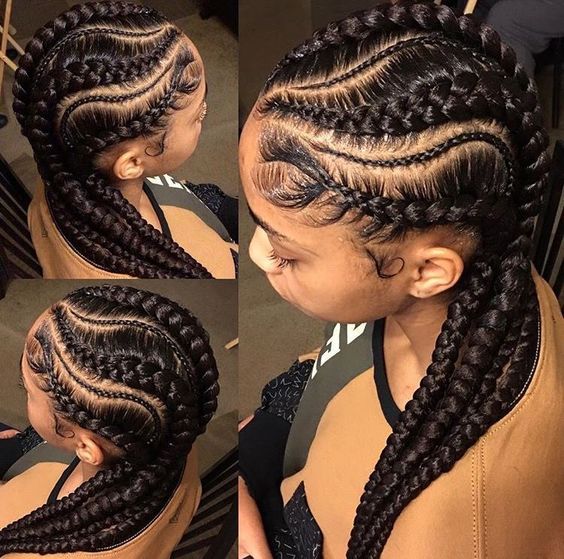
10Zigzag Ghana cornrows

For Square & Rectangle face shapes, can try to get really creative with the parting and braiding, adding curves and zigzags, that will soften your angles.
11Side Cornrows
For Triangular faces, should opt for braids that will face all to one side of the face, balancing out your facial structure.
12Ghjana Braids Ponytail
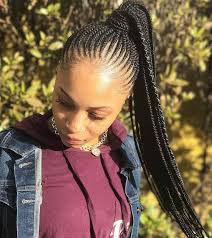
For Diamond faces, should opt for braids that start at the center of the hairline, adding width to your face.
13Red Ghana Cornrows
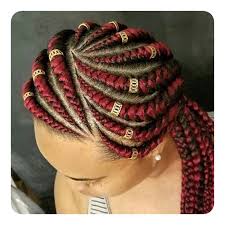
For heart faces, any style you may choose will result in flattering your facial structure even more.


